

Make a Grand Entrance: How to Elevate Your Space with Hardwood Floor Medallion
Hardwood floor medallions add a unique, decorative touch to any space. This guide explores different styles, materials, and installation techniques to enhance your flooring design. Learn how medallions can be custom-made or pre-designed to match various aesthetics, from classic to modern. Discover expert tips on proper placement, integration with existing hardwood floors, and whether to DIY or hire a professional for installation. Medallions can be a focal point in entryways, dining rooms, or hallways, elevating the elegance of your home. Whether you’re remodeling or installing new hardwood floors, adding a medallion is an excellent way to make a statement. Upgrade your space with this timeless flooring feature!

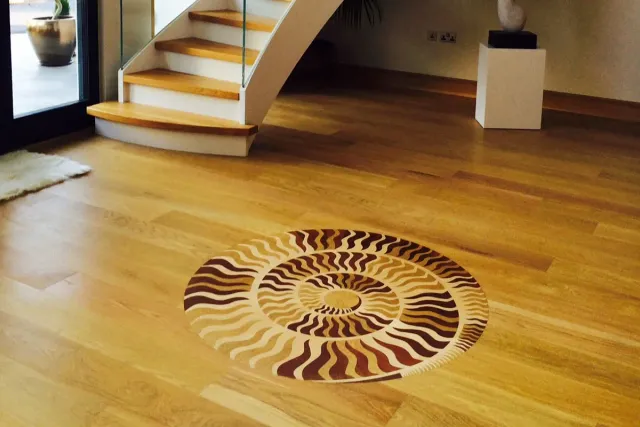
What if your floor could greet guests before you ever said a word? That’s the quiet power of a well-placed hardwood floor medallion. It brings a sculptural elegance to even the most minimalist spaces—introducing geometry, warmth, and intention right where you stand. Whether under a chandelier, in an entranceway, or down a sweeping hallway, medallions create visual gravity. They don’t shout. They whisper sophistication.
This guide explores what floor medallions are, how to size and install them, and why they’re the secret detail designers don’t talk about nearly enough.

What Exactly Is a Wood Floor Medallion?
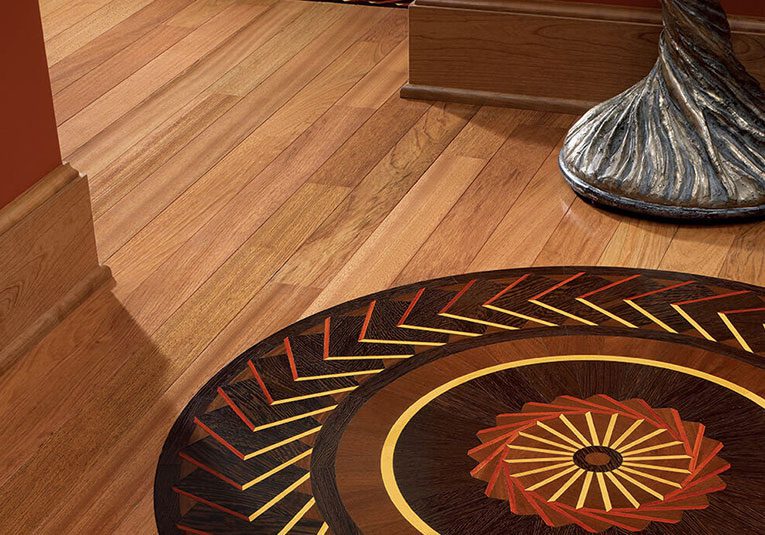
A wood floor medallion or inlay is a carefully crafted design cut from various species of wood to make the assorted colors. Medallions combine the best of computer-aided cutting technology with high-quality woodworking craftsmanship to create elegant works of art that enrich any room.
The design can be anything from a family crest to a corporate logo to an intricate geometric pattern. They are typically round, but you can have them custom made in any shape and design to suit your personality.
Like a beautiful jig-saw puzzle, artisans cut and shape various species of wood. They fit them together into one unique piece. The final assembled piece glues to a backing board, usually marine-grade birch plywood, to prevent warping. They are statement pieces that set your home apart from the rest.

Anatomy of a Hardwood Floor Medallion
You’ll find a large assortment of ready-made medallions in standard sizes of 24, 30, 36, 48, 60, and 72 inches round. There are also square, rectangular, and other geometric patterns.
To create the shades, manufacturers blend many species of wood, including ash, cherry, maple, walnut, white oak, and more…
Most medallions come unfinished, and the thickness is 3/4 in. or 5/16 in. with square edges. That way, it can be sanded and finished at the same time as the surrounding floor to make a tight, seamless fit. All inlay elements use a low VOC polyurethane adhesive.
Wood floor medallions are also available pre-finished using a water-based sealer and three coats of finish. Unless otherwise specified, the finish will be semi-gloss.
Medallions can be installed into new or existing hardwood floors. We’ll get into the installation in a moment.
Custom vs Ready-Made Medallions
If you don’t like any of the premade designs, you can order any custom design to match your unique vision. Once cut, master artisans painstakingly assemble each piece to create a one-of-a-kind medallion.
The typical lead time for a custom wood floor medallion is four to six weeks from when you order until shipping. Your manufacturer will advise you, and we have some links further below.
Sizing Your Medallion Like a Designer
One rule of thumb for selecting the size is to cover one third the width of the room or space. For example, if the room is 15 ft. by 20 ft., then a good option is a 5 ft. (60 in.) inlay.
Some designers will use a proportionally larger inlay in the entrance foyer for a dramatic effect. Use it as an accent for the floor and the room. However, if it’s too big, it can overwhelm the rest of your interior design.
How to Install a Floor Medallion
The method to install a medallion into a pre-existing floor or a new floor is the same. The difference is whether you plan to sand and finish the entire floor on-site or use pre-finished planks.
Before you get started, you’re going to need a few tools.
Tools You’ll Need:
- Router and bit to cut out the pattern in the floor
- Medallion template or jig (usually furnished)
- A pencil and a ruler to outline the cutout
- Double-sided tape or finishing nails to attach the template to the floor
- Flooring adhesive to glue down the medallion
- Shop vacuum to vacuum dust after each pass of the router
- Quality wood filler to fill in the gaps
Here are a few more tips before proceeding with the installation.
Sub-floor and Climate Requirements
- The humidity of the sub-floor must not exceed 12%, and the difference between the medallion and subfloor must be less than 4%. Purchase a quality wood moisture meter, a.k.a. hygrometer to check the wood’s moisture.
- If this is a new home, be sure that the air conditioning and heating systems are up and running. The room must have a consistent temperature and humidity for the proper acclimation of the wood 14 days before and during the installation. You want a temperature between 65° to 75°F (18° to 23.8°C) and the humidity between 40% and 60%.
- Keep the medallion in the same climate-controlled room. Store it flat and in the original plastic wrap until you’re ready to install it.
- Don’t store the inlays for a long time. Install the medallion within one to two weeks after receipt to avoid expansion or warping from changes in humidity.
Treat the medallion as you would with any wood floor plank by acclimating it in the room where it will go.
Step-by-Step Installation Overview
To install any wood floor medallion, you’ll start by cutting the floor to the exact shape and size, down to the subfloor. Once you know that the inlay will fit, it’s glued in place.
Cutting the Floor
Generally, medallions up to 60 in. will come with a template. If you don’t have a template, you can make a jig from a piece of ½ inch x 4 ft. x 8 ft. plywood. You can see how to make a jig here.
Attach the template to the floor using double-sided tape, small brads, or staples. When securing a template over the new floor, drive the nails between the joints in the boards to make repairs easier.
Before cutting an existing floor, use a stud finder to find any nails or staples. Remove them or drive them deeper with a nail set to avoid damaging the router blade.
Use the router to cut out the opening. Make two or three shallow passes to avoid burning the wood. Go with a slower RPM and always vacuum after each pass.
For straight sided medallions, draw the outline on the floor and then attach straight boards as a cutting guide for the router to follow.
Dry Fitting and Gluing
Test to see if the medallion will fit before gluing. You will lay two or more lengths of tape under it to lower it into the hole and lift it back out. Check that the sub-floor is smooth and at the correct humidity.
For a prefinished floor, you need to check the height carefully. You may need to sand the back slightly to allow for the addition of adhesive.
Next, apply a high-quality flooring adhesive to the sub-floor. Once the glue is evenly spread, lower the medallion. Be sure it lines up where you want it. Weigh it down evenly using sandbags or comparable items.
Finishing for a Seamless Look
Unfinished floor installation is the best way to go. Any gaps can be patched with the wood putty, then the medallion and the floor are sanded and finished together. This process offers a better fit and a seamless look.
When you glue a pre-finished medallion to the floor, the job is done.
Common Medallion Questions
Here are some common questions about installing wood inlays into floors
Pre-finished or Unfinished?
It’s best to install it into an unfinished floor. That way, it’s easier to sand and finish in unison.
With a pre-finished medallion, it must match the sheen (satin or high gloss) of the surrounding floor. It must be the exact height of the surrounding floor from the moment it’s glued in place. There is no going back. If it fits, it’s faster to install, but more susceptible to gaps or scratches during installation.
Are Wood Floor Medallions Stained?
Medallion manufacturers take pride in the fact that the color comes from the wood’s natural pigment. Designing a medallion is an art, using each wood species for its unique tone and hue.
No reputable medallion manufacturer will use paint or stain.
What Other Tips Do I Need?
- Always wear eye, hearing, and dust protection.
- Inspect the router first. Look for chips in the carbide, frozen bearings, worn shaft, and be sure set screws and nuts are tight in bit assemblies. Look at the condition of the collet.
- Avoid wood burns by cutting with two light passes instead of one heavy pass and use a slower rpm.
Download this manufacturer’s guidelines if you need more details. OSHKOSH installation guides.
Behind the Craft: Watch How It's Made
Best Hardwood Flooring Medallions Library 2017 – This video is an incredible slide show of gorgeous design ideas accompanied by funky disco music. You can always turn down the sound.
Assembling wood flooring medallion inlay – A video by Lighthouse Laser Arts, demonstrating the hand assembly of a floor medallion.
Also, by Lighthouse Laser, this video shows the Tahari Library 3D Inlaid Wood Flooring and how they finished this intricate medallion.
Installing a Floor Medallion video – This silent video displays written instructions that accompany each step of the installation process.
Installing a Wooden Medallion in a Hardwood Floor – Demonstrating how to install a compass rose design inlay.
This video for Installing a Hardwood Flooring Medallion Inlay demonstrates how to install a straight-sided, octagonal design. Use the same techniques for any straight-sided inlay.
Where to Find Your Medallion
To begin shopping for the perfect inlay for your project, we’ve compiled a list of reputable manufacturers for you:
USA Inlays – Over 30 designs on display.
Oshkosh Designs – Filter your search by price, size, and species
Czar Floors – View almost 200 patterns
Hughs Fine Inlays – From 10 in. to 74 in. on display
Renaissance Floor Inlays – Click on any of 79 patterns for a closer view
Rose Farm Inlays – They make custom inlays, especially star designs
Lighthouse Arts - Intricate 3-D, traditional, artistic, or nautical designs
Each of these manufacturers can help you with a custom design if you prefer.
Design That Anchors the Room
In a world of fleeting trends, a wood floor medallion is a quiet architectural statement—one that blends permanence with personality. It invites the eye to pause, the guest to linger, and the space to breathe. Whether you’re restoring a heritage home or elevating a new build, medallions offer a chance to tell a story underfoot.
Looking for the perfect base to frame your design? Explore Easiklip’s solid oak flooring—crafted to click together effortlessly, pre-finished to save you time, and ready to surround your medallion with timeless style.
Shop Easiklip floors and medallions →


