10 Smart Wood‑to‑Tile Transition Ideas for Seamless Floors
Creating a smooth wood-to-tile transition enhances both functionality and aesthetics in your home. This guide explores 10 creative transition ideas, including T-molding, reducer strips, flush transitions, and decorative inlays. Learn how to choose the best option based on floor height differences, style preferences, and durability needs. Discover expert tips on ensuring a secure fit, proper spacing, and achieving a seamless blend between hardwood and tile floors. Whether you’re designing an open-concept space or connecting different flooring materials in separate rooms, these transition ideas provide stylish and practical solutions. Elevate your flooring with professional-quality wood-to-tile transitions for a polished, high-end look!

That junction where wood meets tile is more than just a seam; it's a secret design weapon. A thoughtful wood to tile transition defines zones, smooths out height changes, and creates visual harmony across spaces.
Instead of seeing it as a fix, think of it as a chance to elevate your space: use eye-catching patterned tiles, sleek metal strips, or contrasting wood tones to define areas and guide the eye. A smart transition does more than bridge a height difference—it injects polish, purpose, and visual interest into your kitchen, dining room, or entryway.
✔️ It defines zones (like from kitchen to dining area)
✔️ It smooths out height and texture changes
✔️ It protects edges and maintains a clean, cohesive flow
Imagine stepping from a cozy wood floor onto beautifully patterned tile, guided by a handcrafted transition strip that ties both surfaces together beautifully. No tripping hazards, no jarring changes—just seamless elegance that feels intentional.
Interested in testing a look before committing? Try one of our complimentary sample transition strips—perfect for seeing how it works in your own home, no guesswork.
Ready to give your floors the upgrade they deserve? Claim your free sample now ⬇️
Designing a Smooth Wood-to-Tile Transition That Feels Seamless
A great floor transition does more than fill a gap—it creates a cohesive layout.
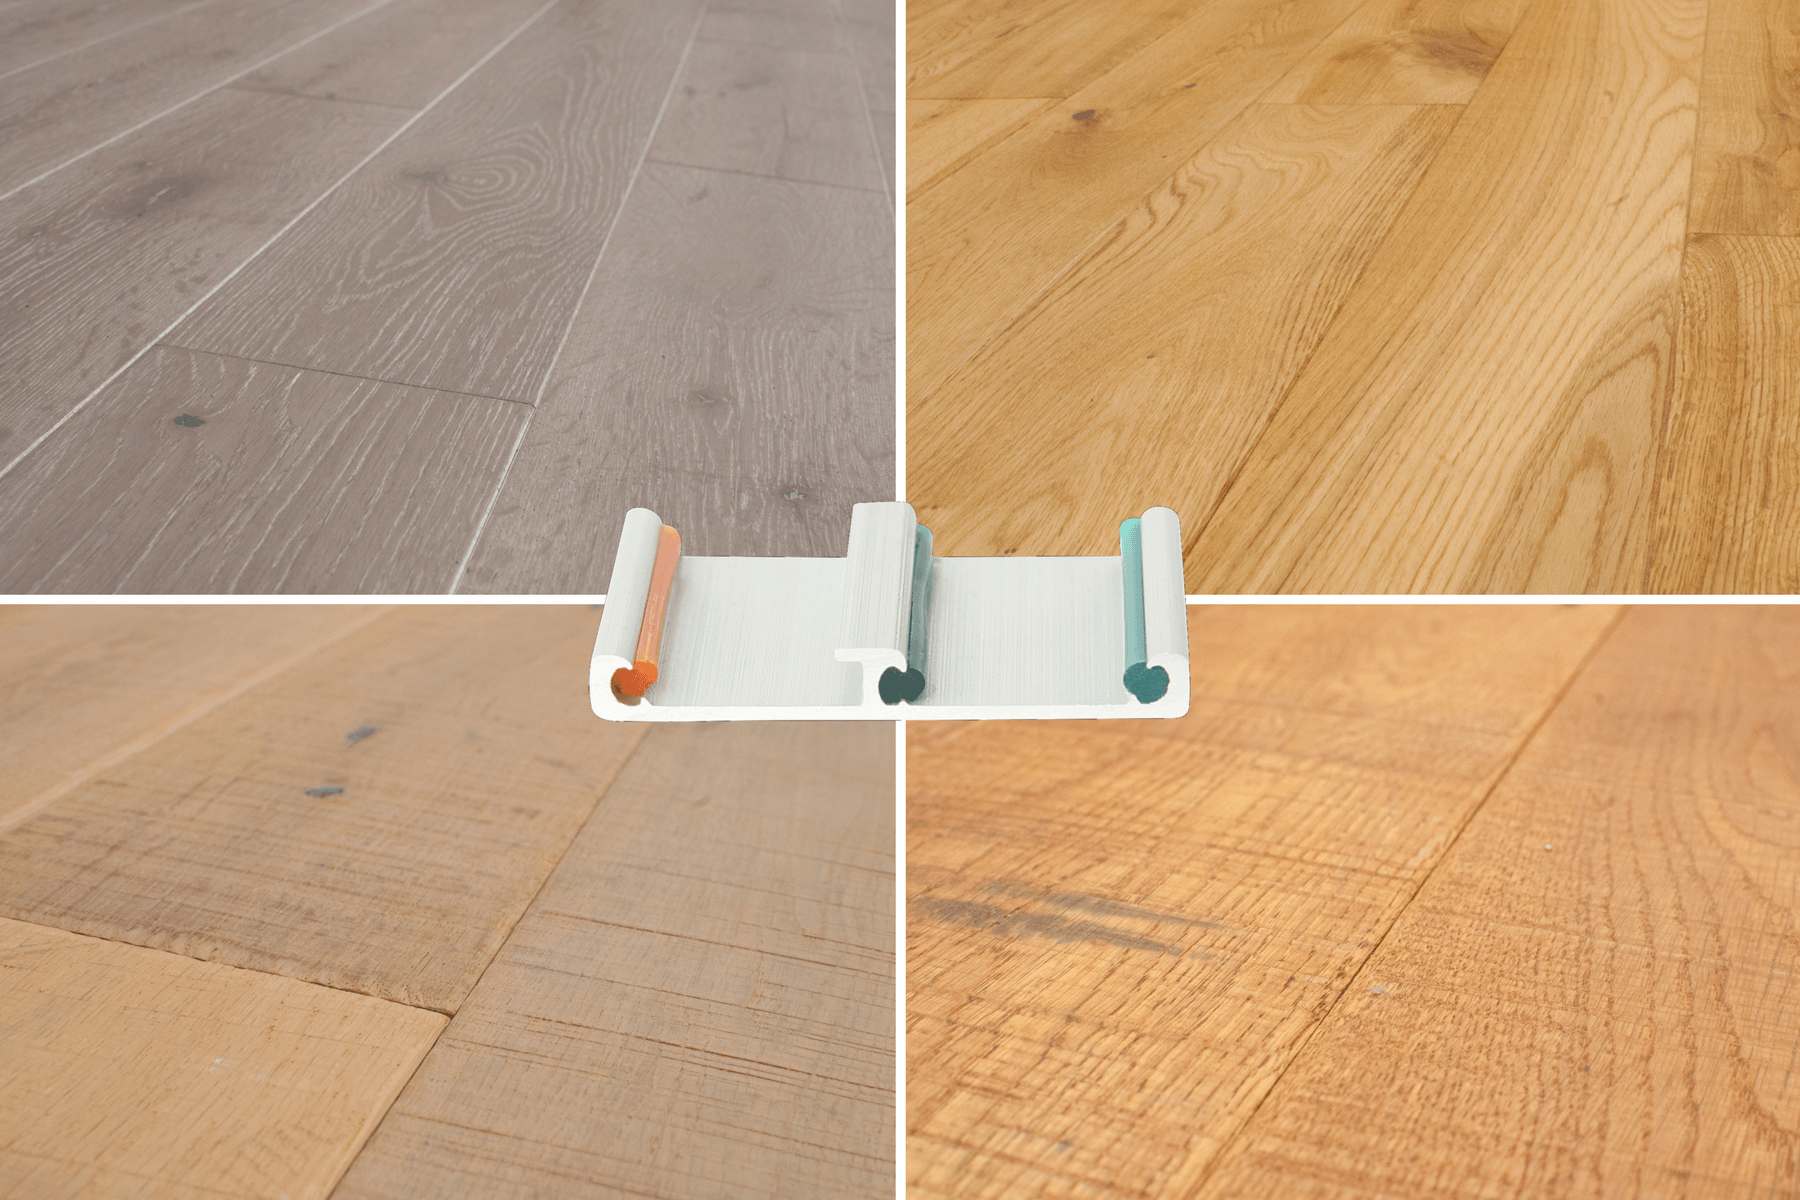
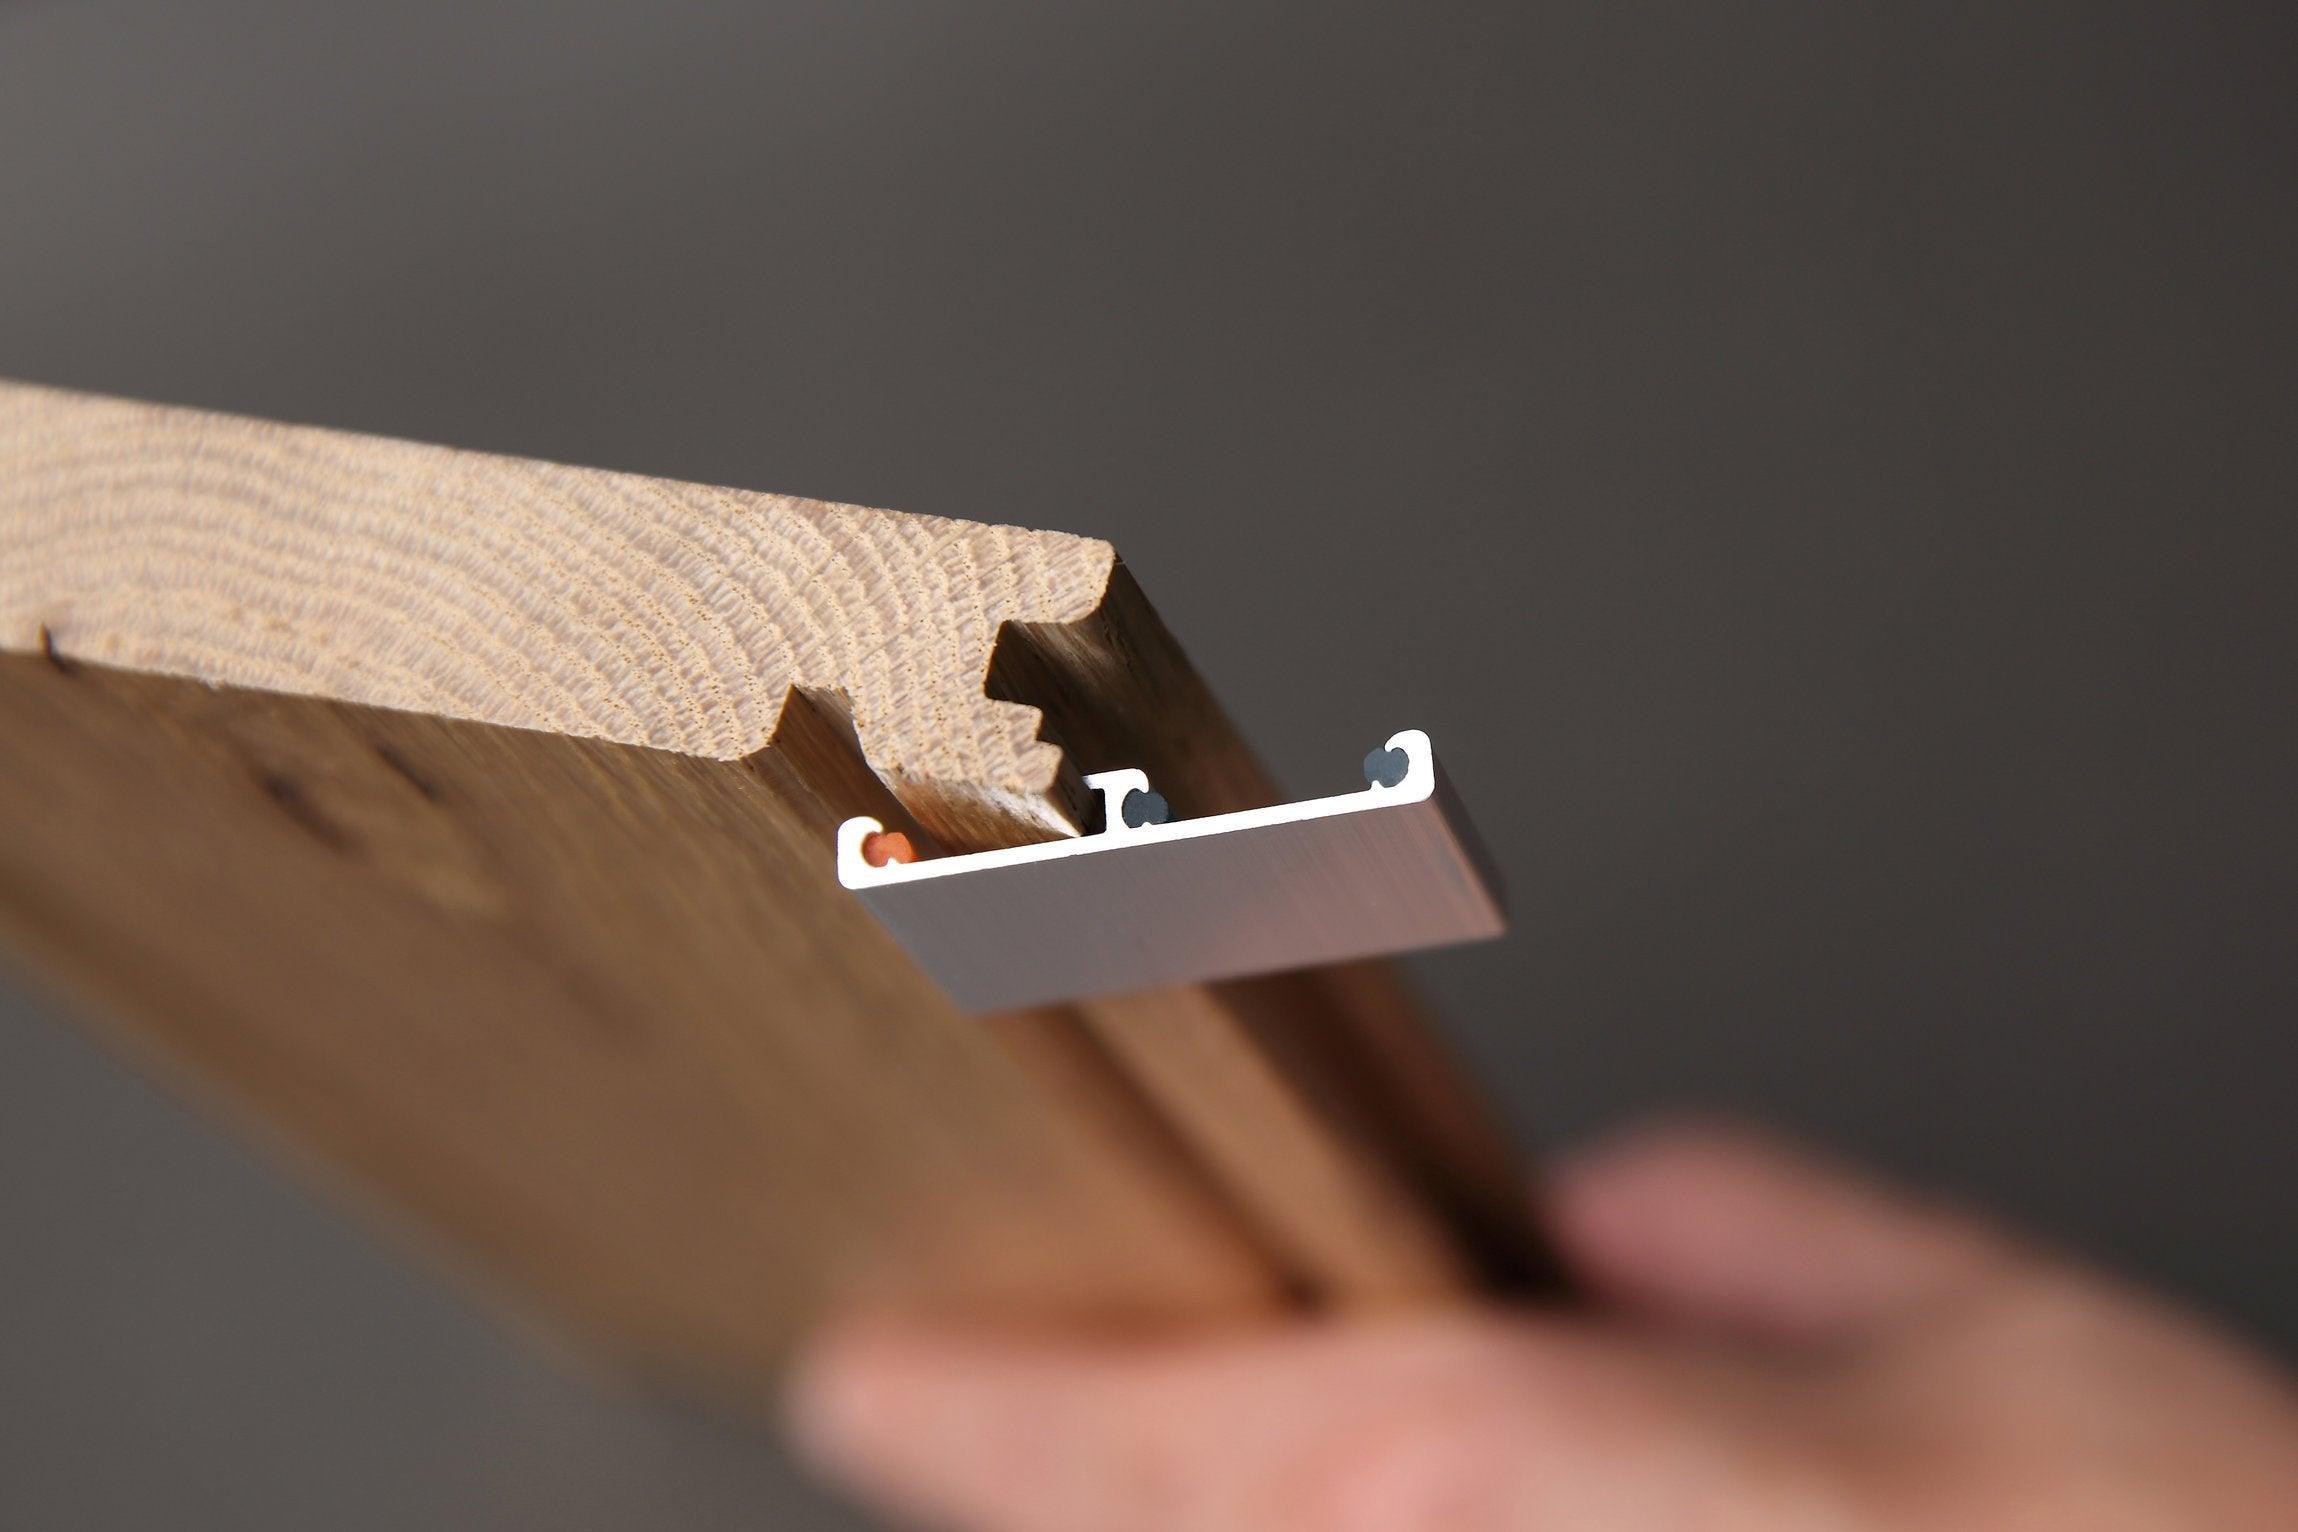
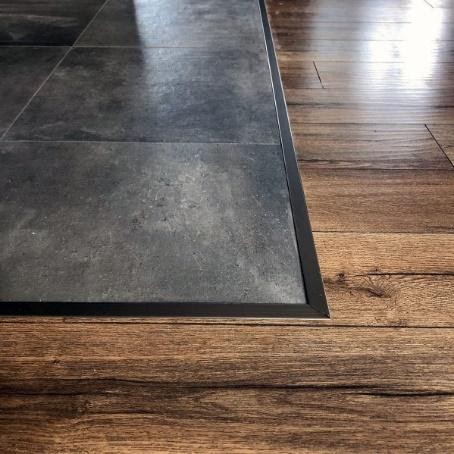
The simplest approach? Transition strip options cover everything from wood and metal to tile profiles—they're easy to match to your flooring and especially helpful when you're working with uneven floor heights—like solid hardwood meeting ceramic tile. Clean, practical, and easy to install.
But you can take it a step further. Want something more custom? Try a curved transition to soften the transition between rooms, or use diagonal lines to create movement and structure without the need for walls. These creative cuts aren't just decorative—they help guide the eye and give your space a more architectural feel.
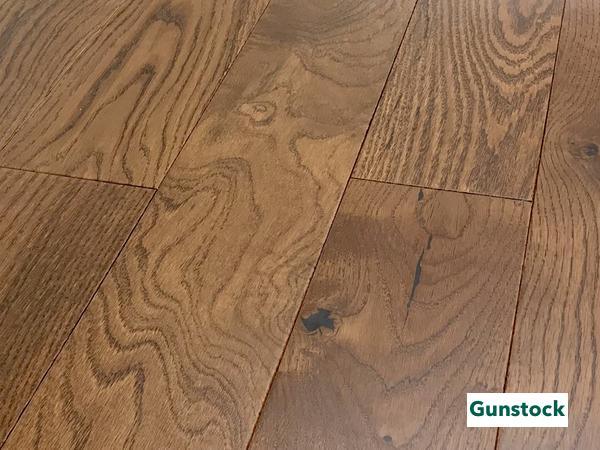
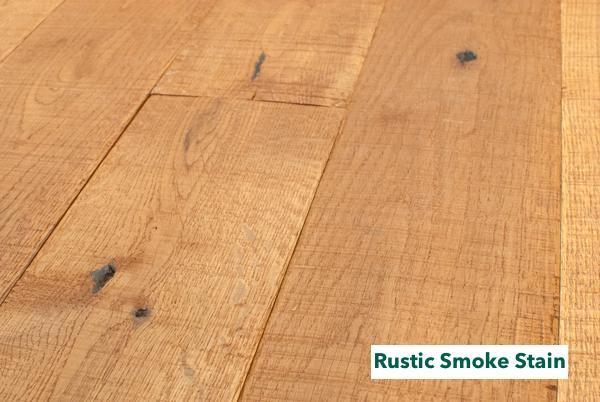
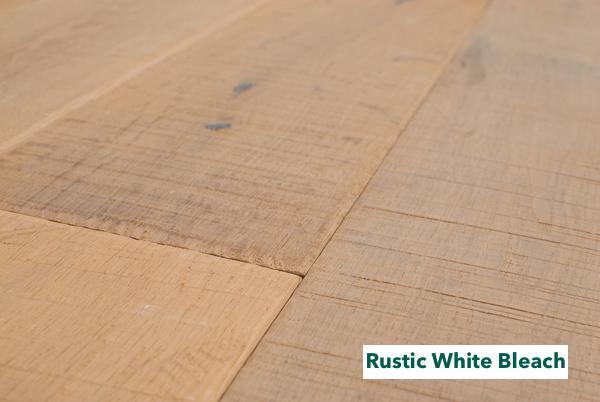
As always, colour and tone matter. Contrast can be striking—light wood against dark tile makes a bold statement. A light white oak finish paired with dark slate or charcoal tile is a popular pairing. Prefer a softer look? Stick with similar tones—something like a warm gunstock oak alongside neutral tile blends the transition more naturally. The 60-30-10 design rule is a great place to start if you're unsure: 60% main colour, 30% secondary, and 10% accent.

And don't forget about height. Wood and tile rarely sit at the same level. To keep things smooth (and safe), adjust the subfloor during installation or use a reducer molding guide to choose the profile that compensates for the difference. This is especially important in high-traffic zones like doorways and stairways.
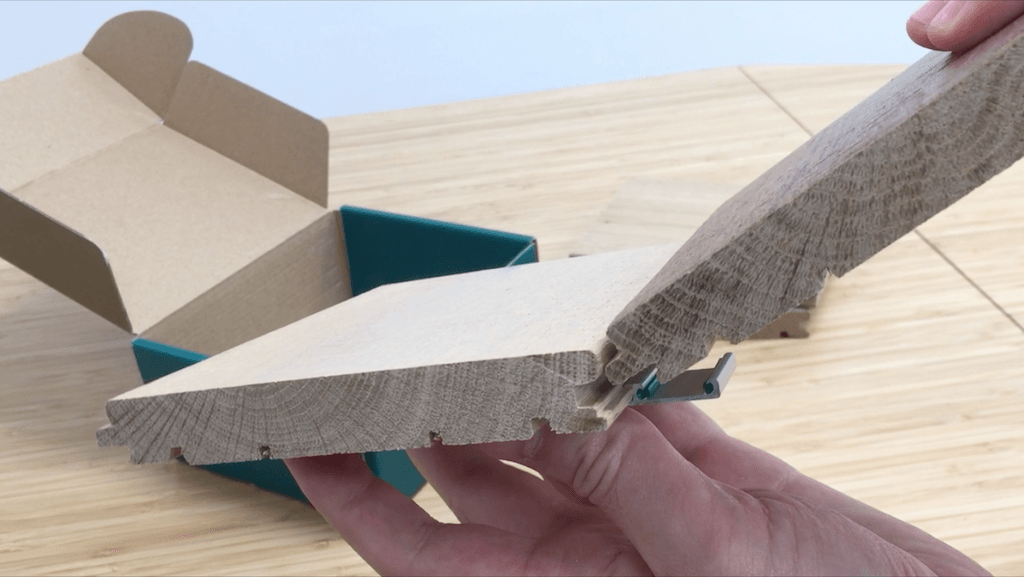
Still deciding on your flooring? Easiklip solid hardwood is a floating floor system that installs without nails or glue—ideal for DIYers who want real wood without the hassle. It's designed to work over most subfloors, including concrete, and pairs beautifully with tile. Fast to install. Easy to maintain. Built to last.
Now, let's dive into 10 transition ideas that go beyond the basics—and help you create a space that looks intentional, cohesive, and professionally finished.
10 Stylish Wood-to-Tile Transition Ideas You'll Actually Love
Hardwood and tile might be worlds apart in texture and appearance—but that contrast is exactly what makes their meeting point so powerful. When done right, a transition between the two doesn't just fill a gap—it becomes a feature.
Designers and DIYers alike are getting creative with wood-to-tile transitions, finding new ways to blend style with practicality in their floor design. Whether it's a sleek strip, a bold inlay, or a patterned edge, the goal is always the same: to make the shift between materials feel smooth, intentional, and part of the bigger design picture. Creating a distinct separation can enhance the overall design while still allowing for a seamless flow between the areas.
Here are 10 great floor transition ideas that go beyond the standard T-moulding—and turn your flooring into something worth showing off.
1. Metal Transition Strips
An excellent choice for clean, simple transitions. Metal strips—available in aluminum, stainless steel, or brass finishes—are great for adding a modern touch while keeping things low-profile. You'll find them in shiny, satin, or matte options to match your space. These strips are easy to install and especially helpful in narrow spots like doorways or hallways.

2. Tile Inlays for Busy Areas
Think of this like a built-in rug—except it's tile. A tile inlay adds a decorative break in a hardwood floor while offering protection in high-traffic areas like kitchens and entryways. It can also be used to define zones within open layouts, such as transitioning from a kitchen to a dining area. It gives visual contrast, keeps things clean, and helps define zones within open layouts. Bonus: it's easier to clean than a real rug.

3. Geometric Flow Transitions
Hexagons. Diamonds. Zigzags. If you want something bold, intricate patterns are your move. Let your tile flow into your hardwood using a staggered geometric pattern. Lay the tile first, cut the hardwood to match, and take your time—this one's all about the details. It's more work, but the finished look is designer-level.

4. Matching Width Planks
If your tile is plank-style, match it to the width of your hardwood boards. It's a subtle move, but it makes the transition look effortless. Great for bathrooms, laundry rooms, or anywhere water resistance matters. You get the look of continuity with the function of tile, ensuring a smooth transition between different flooring types.

5. Hardwood End Cap
Have an uneven transition to deal with? Use a hardwood plank as an end cap. It doubles as a threshold while visually blending both floors. If your wood is higher than the tile, taper the plank for a safe, smooth edge. It's an elegant solution that keeps things looking finished without calling too much attention to the transition itself.

6. Doorway Transitions
Doorways are classic transition points—and they don't have to be boring. When transitioning from one room to another, consider creating a seamless flow by using appropriate materials and design elements. Use a wood strip, metal edge, or even custom-milled moulding. Want it to disappear? Use the same wood species and stain as your floor for a seamless look. For transitions near staircases, follow a solid stair transitions guide to get a clean, rounded edge that handles the height change safely. The right doorway transition helps rooms feel connected without losing their character.

7. Tile or Stone Threshold
Instead of wood, try a tile or stone insert in the gap between floors. It's a great way to create a striking focal point by adding a pop of colour or texture—especially in neutral spaces. Choose something that ties into both floors, and make sure your grout complements the palette. It's a small detail that makes a big impact.


8. T-Moulding for Equal Heights
When both your tile and wood floors are the same height, T-molding transitions are your best friend. Most wood flooring brands offer matching versions. It snaps into a metal track and floats slightly above the joint, allowing for natural movement. Simple, clean, and ideal for first-time DIYers looking to achieve smooth transitions.
9. Blended Sawtooth Edges
Here's one that really stands out. Instead of a straight cut, blend the tile and hardwood with a sawtooth pattern where tiles meet. It's especially striking with square or herringbone tile. The shapes create a sense of movement while still maintaining structure. Cut tiles to 90°, and angle the wood at 45° to match.

10. Glass Mosaic Accent Strips
Want a little drama? Add a strip of glass mosaic tile between your wood and tile for the perfect combination of design aesthetics and functionality. It acts like a high-end accent border and can be customized to match your space. Glass tile brings light, colour, and texture—and looks especially sharp in kitchens, bathrooms, or anywhere you want a designer touch.

Transition Ideas for Specific Rooms
Different rooms in a home require unique transition ideas to create a functional and aesthetically pleasing space.
For instance, a kitchen floor transition may involve a tile to wood floor transition, while a bathroom may require a more waterproof solution, such as a tile transition with a curved edge. In a living area, a seamless transition between hardwood floors and tile can be achieved using a straight line transition or a gradual transition.
The choice of transition idea depends on the specific needs and design of the room. For example, a bold design statement can be made in a kitchen using a herringbone pattern or contrasting colors, while a more subtle approach may be suitable for a bedroom.
The use of ceramic tiles, marble tiles, or other flooring materials can also add depth and texture to a space.
Materials and Techniques
Various materials and techniques can be used to create a visually appealing transition between two different flooring materials. For example, wood transition strips can be used to create a seamless transition between hardwood floors and tile, while metal transition strips can add a modern touch to a space. The use of patterned tiles, such as a herringbone pattern, can also create a unique and eye-catching design.
Additionally, the use of similar tones and textures can help to create a harmonious transition between two different flooring materials.
The choice of material and technique depends on the specific design and functionality of the space. For instance, a big difference can be made in a room by using a bold and contrasting material, such as a dark tile with a light wood floor.
DIY Wood-to-Tile Transitions: Make It Your Own
A floor transition might seem like a small detail—but when done right, it makes a big impact.
Whether you're connecting tile to hardwood, stone to wood, or even two types of wood flooring, a well-planned flooring transition adds polish, structure, and flow to your space. And with the right approach, you can do it yourself—no special tools, no complicated steps.
Easiklip solid hardwood flooring makes this kind of project simple. Our clip-together system installs without nails or glue, which means you can easily pair it with tile, natural stone, or even decorative inlays. It's fast, clean, and beginner-friendly—perfect for homeowners who want a high-end look without hiring a contractor. Before you start, weigh up the DIY installation costs versus hiring a pro—most homeowners find the savings are substantial. Want a completely custom finish? Our unfinished solid oak planks let you stain and seal to match any tile or design palette.

Many of the transition ideas in this guide also work for breaking up open floor plans, adding visual interest, or solving height differences between rooms. If you're looking for wood floor transition ideas, explore creative and aesthetically pleasing ways to connect kitchen tile with wood flooring. If you're looking for a clean finish, we offer solid white oak T-moldings and reducer strips that can be stained to match any colour or flooring style—giving your transition a seamless, custom look.
Not sure which profile fits your situation? Our overview of common transition mistakes walks through the errors most DIYers make—and how to sidestep every one of them.
Kitchen-Specific Transition Tips
The kitchen is one of the most common places for a wood-to-tile transition—and one of the most demanding. Between spills, heavy foot traffic, and appliances that shift over time, the kitchen floor junction needs to be both practical and polished.
Where to place the transition. The most natural spots are under the kitchen island (if it's a peninsula-style layout), at the cabinet toe-kick line, or in the doorway between the kitchen and an adjoining dining or living area. Centering the transition under a doorway keeps the visual break clean and predictable.
Height matching matters more here. Kitchen tiles are often thicker than the surrounding hardwood, which creates a lip that can catch on chair legs or become a tripping hazard. A reducer molding guide will help you pick the right profile for your specific height difference—whether that's a sloped reducer, a T-molding, or a custom threshold.
Moisture is the main concern. Near sinks and dishwashers, water and steam are a constant reality. Keep hardwood ends at least 6 inches from the sink base, and make sure your transition strip seals the joint rather than leaving it open. A waterproof adhesive or snap-track system helps prevent moisture from wicking under the wood. If you're looking for the full picture of transition strip options, the linked guide breaks down every profile type with installation notes.
2026 Trends: What's Changed in Wood-to-Tile Transitions
Floor design has moved fast over the past few years, and transitions are no exception. Here's what's shaping the way homeowners and designers approach the wood-to-tile junction right now.
Flush and seamless is the new standard. Bulky transition strips are increasingly out of favour. Homeowners are levelling subfloors more carefully during installation so the tile and hardwood sit at the same height—eliminating the need for any visible profile at all. When the floors are perfectly flush, a hairline grout joint is all you need. For inspiration and the latest approaches, the 2026 transition trends guide covers this shift in depth.
Hybrid zoning in open-plan spaces. With more homes combining kitchen, dining, and living areas into one continuous space, the transition line has become a zoning tool. Rather than hiding it, designers are using the wood-to-tile border to define functional areas—tile for the kitchen work zone, hardwood for the living and dining side. The line becomes intentional, not incidental. Explore Easiklip's collection to find hardwood tones that work as a deliberate contrast against your tile choice.
Wood-look porcelain is blurring the line. Large-format wood-look porcelain tiles have become so convincing that many transitions are nearly invisible to the eye. When the tile mimics the same grain direction and plank width as the adjacent hardwood, the material change reads as a subtle texture shift rather than a hard boundary.
Curved and artistic transition lines. Straight cuts are giving way to arcs, waves, and geometric borders. A curved transition between tile and hardwood softens an open-plan room and adds an architectural quality that a straight strip simply can't replicate. It requires more careful cutting, but the result is a floor that feels custom-designed from the ground up.
Conclusion: Finish Strong, Floor Smarter
Transitions aren't just practical—they're an essential part of the design. The right one smooths out height changes, protects your flooring edges, and adds that final, professional touch that makes a room feel truly finished.
Whether you choose a bold tile inlay or a subtle moulding strip, what matters is that the transition fits your space—and your style, making it an ideal choice for a bold and visually stimulating design. For those who prefer a minimalist approach, using straight line transitions between different flooring types ensures a clean and cohesive look.
And with Easiklip, you don't need to compromise. You can install solid hardwood floors and create flawless transitions, all on your own timeline and budget.
🔨 Explore our Easiklip flooring collections and finishing accessories to get everything you need to bring your project together—from start to seamless finish.
Frequently Asked Questions
What is the best transition between hardwood and tile?
The best option depends on the height difference between your two floors. When the surfaces sit at the same level, a T-molding gives a clean, low-profile result. When tile is higher than hardwood, a reducer strip tapers the gap safely—our transition strip options guide walks through every profile type so you can match the right one to your situation. For a completely flush look with no visible strip at all, levelling the subfloor during installation is the most seamless approach.
How much space should you leave between tile and hardwood?
A gap of 3/8 inch (about 10 mm) is the standard recommendation between the hardwood end and the tile edge. This expansion gap allows the wood to move naturally with changes in humidity without buckling or pressing against the tile. The transition strip or molding covers this gap entirely, so it won't be visible once the floor is finished.
Do you need a transition strip between hardwood and tile?
Not always—but in most cases, yes. A transition strip protects the exposed edges of both materials, covers the expansion gap, and bridges any height difference. The exception is a flush installation where both floors sit at exactly the same height; in that scenario, a grout joint alone can bridge the two surfaces cleanly. If you're unsure which approach suits your project, reviewing common transition mistakes will help you avoid the most frequent DIY errors.
Can you have a flush transition from tile to hardwood?
Yes, and it's increasingly popular. A flush transition requires that both materials end up at the same finished height, which usually means building up the subfloor under whichever surface sits lower. Careful planning before installation—accounting for tile thickness, adhesive bed, and hardwood thickness—is essential. Check out the latest 2026 transition trends for detailed examples of how designers are achieving truly seamless wood-to-tile junctions.
How do you transition wood to tile in a kitchen?
In a kitchen, place the transition at a natural boundary—under the island, at the cabinet toe-kick, or in the doorway between the kitchen and an adjacent room. Use a waterproof transition strip or snap-track system to prevent moisture from getting under the hardwood, especially near the sink. Height matching is critical: if the tile is thicker than the hardwood, a reducer molding guide will help you select the correct taper profile to keep the transition safe and smooth underfoot.